Building a custom home in El Paso's Upper Valley is one of the most rewarding projects a family can take on, and it goes much better when you know the sequence before you start. This guide walks through each stage, from setting a realistic budget and choosing a homesite to architectural review, permitting, construction and the first year after move-in. The aim is simple: fewer surprises, better decisions and a house that fits the way you actually live.
Why Build a Custom Home in the Upper Valley?
The Upper Valley sits along the Rio Grande on El Paso's west side, and it feels different from the rest of the city. Mature cottonwoods and pecan orchards, irrigation canals and old farm roads give the area a greener, quieter character than the newer tract developments on the east and northeast sides. Much of this land was farmed for generations. The Fields, for example, stands on the last piece of raw land from Zach T. White's River Bend Farm. White arrived in El Paso in 1881, grew cotton here and even rechanneled the Rio Grande to add farmland. You can read more of that history on our legacy page.
For someone planning a custom home in El Paso, the Upper Valley offers a few practical advantages:
- Established surroundings. Mature trees, older neighborhoods and a settled street pattern give new construction a sense of place from day one.
- Proximity to schools and amenities. Many Upper Valley addresses are close to well-regarded public and private schools, and the west side's shopping and medical services are a short drive away.
- Room for design. Lots in custom-home communities tend to be larger and less uniform than production-home lots, which gives your architect more to work with.
The tradeoff is that custom building asks more of you. You make hundreds of decisions, you coordinate a team, and you carry more of the responsibility for budget and schedule. The rest of this guide is about handling that well.
Step 1: Set a Realistic Budget
Every good custom home starts with an honest number. Before you fall in love with a floor plan, work out what you can comfortably spend in total, then divide that number into its real components.
The four big buckets
- Land. The homesite itself, plus closing costs.
- Soft costs. Architectural and engineering fees, surveys, soil testing, permit and plan-review fees, utility connection fees, insurance during construction and loan costs. These are easy to underestimate. Ask your architect and builder for local ranges rather than relying on national rules of thumb.
- Hard costs. The construction of the house: foundation, framing, roofing, mechanical systems, finishes, and the builder's overhead and fee.
- Site and exterior work. Driveways, walls, patios, landscaping, irrigation and any retaining work. In a community with design covenants, these items are part of the finished look, not optional extras.
Build in a contingency
Almost every custom project runs into something unplanned: a material price change, a design revision, a buried obstruction during excavation. Many builders and lenders recommend holding a contingency, often somewhere in the range of 5 to 10 percent of construction cost, though the right figure depends on how complete your plans are when you sign. The more decisions you finalize before construction begins, the smaller your exposure.
Talk to a lender early
Custom homes are usually financed with a construction loan that converts to a permanent mortgage, or with separate construction and permanent loans. Lenders will want to see plans, a builder contract and a detailed cost breakdown. Meeting with a lender before you finalize the design tells you how much room you have and what documentation you will need.
Step 2: Choose the Right Homesite
Your lot shapes almost everything that follows: the orientation of the house, how much sun hits your windows, where the garage goes and how your outdoor rooms feel. We cover this in depth in our article on choosing the right homesite, but here are the essentials.
Orientation and sun
El Paso is one of the sunniest cities in the country, with hot summers and cool, bright winters. A lot that lets you place the main living spaces and outdoor patio on the north or east side of the house will be more comfortable on summer afternoons. Long west-facing walls of glass are the ones that cause the most heat gain. Good orientation costs nothing extra and pays back every year you live in the house.
Soils and drainage
Soils in the El Paso area vary. Some areas have caliche, a hard, cemented calcium carbonate layer, while river-valley land can have sandier or siltier soils deposited by the Rio Grande. A geotechnical (soils) report tells your engineer what the foundation needs. Although the region gets only about 8 to 10 inches of rain a year, much of it falls in short, intense summer storms, so grading and drainage matter more than the annual total suggests.
Covenants and community
Read the community's covenants and design guidelines before you buy, not after. In a neighborhood like The Fields, which has 35 single-family lots controlled by covenants, those rules protect the character that makes the lots valuable in the first place. They also define what you can and cannot build, so they belong in your decision alongside price and location. You can browse the layout on our homesites page.
Step 3: Assemble Your Design and Building Team
The people you hire matter more than any single material choice. Most custom homes involve three core relationships.
The architect or home designer
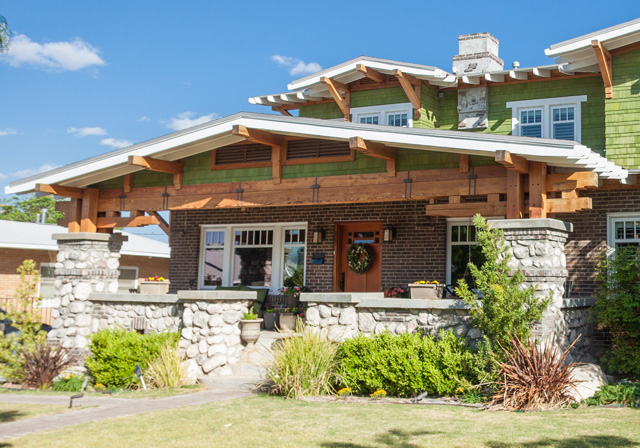
Your architect translates your needs and budget into drawings. Look for someone whose past work includes the style you want, especially if you are drawn to traditional forms such as Craftsman, Spanish Revival, Italianate or English Tudor-Cottage. Historic styles look simple in photographs but depend on details like eave depth, window proportions and wall thickness that an experienced designer gets right the first time. Ask to see built work, not just renderings.
The builder
A custom builder manages subcontractors, schedules, inspections and quality. When interviewing builders:
- Ask for recent references and visit at least one completed home and one active job site.
- Confirm insurance coverage and ask how they handle warranty calls.
- Ask who will actually supervise your job day to day and how often you will meet.
- Understand the contract type. Fixed-price contracts give you a set number for a defined scope; cost-plus contracts pass through actual costs plus a fee and offer more flexibility with less certainty.
The engineers and consultants
Structural engineering is standard for custom homes. Depending on the project you may also work with a civil engineer for grading and drainage, a mechanical designer for HVAC sizing, and a landscape designer. Bringing the builder in during design, rather than bidding a finished set of plans, often helps catch cost problems early.
Step 4: Design and Architectural Review
Design usually proceeds in phases: schematic design (rough layout and massing), design development (materials, windows, systems) and construction documents (the detailed drawings used for permitting and building). Expect several rounds of revisions. This is the cheapest time to change your mind, so take it seriously.
Working within a pattern book
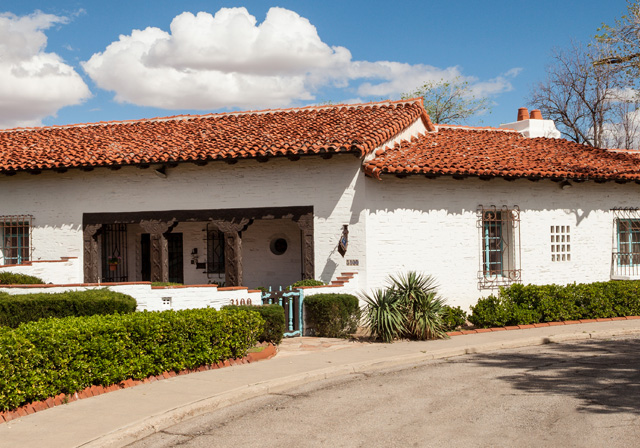
Many planned communities publish design guidelines. At The Fields, a Pattern Book guides the details of each permitted style so that homes feel individual but belong together as a neighborhood. The approach was inspired by El Paso's historic Kern Place and Manhattan Heights, and in particular by the home at 3100 Gold Avenue in Manhattan Heights, built for Katherine White and Paul Harvey under the oversight of Mabel Welch, El Paso's first female architect. That house, with its terra cotta roof, shows how a well-proportioned traditional design can feel entirely at home in the desert. Read more in our piece on the Kern Place and Manhattan Heights legacy.
What architectural review typically covers
- Architectural style and its defining elements (roof form, materials, windows, porches)
- Setbacks, building height and placement on the lot
- Exterior colors and materials
- Garage placement and driveway design
- Walls, fences and landscaping plans
Submit early, preliminary drawings for informal feedback if the community allows it. Catching a problem at the sketch stage is far easier than redrawing a full permit set.
Tip: Decide on finishes before you break ground
The single most effective way to control cost and schedule is to select as many finishes as possible, such as flooring, tile, plumbing fixtures, cabinets, countertops, lighting and appliances, before construction starts. Every decision left open becomes an allowance in the contract, and allowances are where budgets drift. Long-lead items like custom windows, doors and some appliances can take weeks or months to arrive, so ordering them early also protects your timeline.
Step 5: Permits and Approvals
Once architectural review signs off, your builder or architect submits construction documents to the local building authority. Depending on the property's location, that may be the City of El Paso or El Paso County, and requirements differ between jurisdictions. Your builder should know which applies and what the current submittal requirements are.
In general terms, you can expect:
- Plan review for building code compliance, including structural, energy, electrical, plumbing and mechanical elements.
- Utility coordination for water, sewer, electric and gas connections.
- Site-related review such as grading, drainage or driveway access where applicable.
- Inspections at defined stages during construction, typically foundation, framing, rough mechanical/electrical/plumbing, insulation and final.
Review times vary with workload and the completeness of the submittal. A clean, well-coordinated set of drawings is the best way to avoid resubmittals. Ask your builder for a current estimate rather than assuming a fixed number of weeks.
Step 6: The Construction Phases
Every home is different, but most custom builds move through the same general sequence.
| Phase | What happens | Your role |
|---|---|---|
| Site preparation | Surveying, clearing, rough grading, utility trenching | Confirm house placement and finished floor height on site |
| Foundation | Excavation, forms, reinforcement, plumbing under slab, concrete pour | Walk the layout before the pour; changes after are costly |
| Framing | Walls, floors, roof structure, sheathing, windows and exterior doors | Walk the rooms; check window heights, views and door swings |
| Rough-ins | Plumbing, electrical, HVAC, low-voltage wiring | Verify outlet, switch, lighting and data locations |
| Exterior envelope | Roofing, weather barrier, stucco, stone, brick or siding | Approve color samples in daylight on the actual wall |
| Insulation and drywall | Insulation installed and inspected, then wallboard | Photograph walls before drywall for future reference |
| Interior finishes | Cabinets, trim, flooring, tile, paint, fixtures, appliances | Stay responsive to questions to avoid delays |
| Site finishes | Driveway, hardscape, landscaping, irrigation | Coordinate with community landscape standards |
| Final and closeout | Final inspections, cleaning, punch list, certificate of occupancy | Complete a thorough walkthrough |
How long does it take?
Timelines vary widely with size, complexity, weather, material availability and how quickly decisions are made. As a very rough guide, many custom homes take somewhere around a year or more from construction start to completion, with design and permitting adding several months before that. Larger or highly detailed homes can take longer. Treat any single number with caution and ask your builder for a schedule based on your actual plans.
Building in El Paso's climate
The dry climate is generally kind to construction schedules, but it has its own considerations. Concrete placed in summer heat needs proper curing to avoid cracking, and crews often start very early in the day during the hottest months. Spring wind can slow roofing and stucco work, and the summer monsoon season brings occasional heavy storms that make temporary erosion control important on an open site.
Step 7: Final Walkthrough, Move-In and Warranty
As construction wraps up, you and your builder will walk the house together and compile a punch list of items to fix or finish. Be thorough and specific. Test every door, window, faucet, switch and appliance. Look at paint and trim in both natural and artificial light.
Documents to collect at closeout
- Certificate of occupancy and final inspection records
- Warranty documents from the builder and from manufacturers (roofing, windows, HVAC, water heater, appliances)
- As-built information, including photos of walls before drywall
- Paint colors, finish selections and product model numbers
- Maintenance guidance for systems such as HVAC filters, irrigation controllers and water treatment
The first year
New homes settle. Minor drywall cracks, sticking doors and small adjustments are normal in the first year as materials dry and seasons change. Most builders offer a limited warranty that covers workmanship for a defined period, with longer coverage for certain systems and structural elements. Understand exactly what your warranty covers and how to submit requests. Many builders schedule an 11-month walkthrough so issues can be addressed before the main workmanship coverage ends.
This is also when your landscaping establishes itself. If you have planted native and adapted species, the first summer is the one that needs the closest attention to watering. Our guide to Chihuahuan Desert landscaping covers what to expect.
How This Process Works at The Fields
The Fields was planned around a simple idea: we provide the environment, you provide your home. The community supplies the setting, which includes the covenants, the Pattern Book, an approximately 11,000-square-foot public park, HOA-managed landscaping true to the Chihuahuan Desert, and a hike and bike trail along Sunset that will eventually connect to Riverbend Park. Owners bring their own architect and builder and design a house within one of four historic styles.
That structure means you get the freedom of a true custom home with the reassurance that your neighbors are held to the same standard. Families also value the location: Zach White Elementary and private Montessori and parochial schools are within walking distance, and Lincoln Middle School and Coronado High School are roughly a ten-minute drive.
If you are early in the process and have questions about lots, design guidelines or timing, our contact page is the best place to start, and our FAQ answers many common questions.
Key Takeaways
- Budget for land, soft costs, hard costs and site work separately, and hold a contingency for the unexpected.
- Choose a homesite with orientation, soils, drainage and covenants in mind, not just price and view.
- Hire an architect experienced in your chosen style and involve your builder early in design.
- Use preliminary architectural review to catch problems before drawings are finalized.
- Finalize finishes and order long-lead items before construction starts to protect budget and schedule.
- Collect all warranty and as-built documentation at closeout and plan an 11-month walkthrough.

We are the family and team behind The Fields, stewarding the last piece of Zach T. White's River Bend Farm into a legacy neighborhood. Questions? Contact us.